Intro
Basics
Skills
Growth
Health
Faith
Prep
Misc
In 1995 we had the wonderful opportunity of building a new home. We took off school work that year, and spent our time constructing and finishing the house. Some local friends who were specialists helped, particularly on projects that required certification.
We ordered a Modular home with the first floor mainly finished and the upstairs open. There were a lot of things to do, but the experience was well worthwhile.

Taking down our old house.
Ground preparation
We did not have heavy equipment when the house went in, so we brought in a local contractor for most of that work. They took down the old house and leveled the location, dug out the foundation, and buried some of the larger boulders.

Plumbing under the basement floor.
Foundation The foundation requires a firm footing to sit on. In our case we poured a footer, then the walls. Finally the floor was poured. The footer should rest on bedrock if possible, but it must be below frost line. Once the walls were up, we sealed the concrete to prevent water seeping through which would create a very damp basement. The inside was later painted with an epoxy paint which further sealed it.

Almost ready to pour the floor.
Drain plumbing
Before we poured the floor in the basement we put in a set of drain pipes so we would be able to add a kitchen and bathroom. (It is very difficult to do this later). Different size pipes require different slope, so we had to work at getting it just right. After having used them for a decade, they are still working well, so I guess we did a good job.

Our new house arrives in two pieces.
Setting the house
The house came as a modular, on two trailers. The house company used a crane to lift the sections off the trailers, and they were placed on the foundation. Then the two halves were bolted together.

Flipping the roof.
Flipping the roof
One side of the roof was a full dormer, so they used the crane to flip it over and attached it to the rafters. Now that it is in place it is difficult to tell that it was ever folded over.

Craig builds the chimney one stone at a time.
Chimney
Dad decided to put in a stone chimney. He talked with two local masons for instruction, and stayed up many very late nights. The end result is beautiful, but we are not sure if we would do it again.

Craig lays the stone hearth.
Interior finishing - main floor
All but one room of the main floor was finished at the factory, so we had only a couple of projects. Dad built a stone hearth (connected to the chimney). It is built on a steel grate, and is completely suspended on the chimney.

Nathanael prepares for elctrical wiring.
Connecting Electrical
As the house was a modular, the electrical service came disconnected. Most of the wiring was installed. We ran the cable from the outside breaker in to the main circuit breaker panel. Then we connected the wiring from the rest of the house. The second story had to be completely wired.
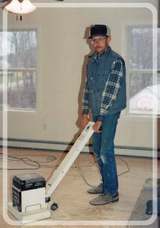
Craig sands the wood floor in the livingroom.
Wood flooring
Mom and I did the wood flooring in the living room. That project was a lot of fun. we used tongue and groove flooring. We used a Chop saw to cut the boards to length.

Jeremiah learns from his father how to plumb a sink.
We have hot water basebord heat, so when we did the upstairs plumbing we had two types of copper tubing to run. One set for hot water, and one for heat. That provided plenty of work soldering the joints. We ran the pipes over the top of the floor joists, so we had to use metal plates to protect the pipes from the nails that held the flooring down.
While we had lived with exclusively wood heat in the old house, this one has hot water baseboard heat. It was quite a bit of work getting it installed, but it sure is nice to not be completely dependent on wood for heat.

More stones, this time its a patio.
After completing the chimney Dad went on to build a set of stone sidewalks and retaining walls around the house. Stonework is heavy, dirty work, but the results are very pleasing. This makes for four raised beds in which to plant flowers. Most of the year we enjoy the stone walkway, but come wintertime we wish we had a smoother surface to shovel.
Flooring
The upstairs came open - with insulation in the floor. After putting in the plumbing, and heating pipes, we put down the plywood floor.

Grampy helps Jeremiah put in walls upstairs.
Stud walls
After the floors were in, we started on the stud walls. (2x3) We framed in the rooms' walls first, then the closet walls. After the walls were up we ran the electrical wires, and placed the outlet boxes.

Caleb assists with insulation.
Insulation
The upstairs had to be insulated, Dad also added extra insulation to improve heating efficiency. The insulation in the roof joists required the addition of special channels to maintain airflow.

Hannah and Nathanael put up sheetrock.
Sheetrock
With the walls up and electrical and plumbing run, it was time to put sheetrock on the walls and ceiling. We all worked on this, holding it up and screwing it into place. Once the sheetrock was up we had to learn how to spackle. We filled the indentations left by the screws so the end result would be smooth. We watched several home construction DIY video's for tips.

Zechariah paints the basement stairwell.
Painting
Sheetrock has a paper cover, so it needs to be painted. This task was spread out between many different people. We first learned of pad painters at this time. One is specifically designed for any place a color changes at an angle - very nice.
Carpeting
Having completed the sheetrock and painting there was no longer danger of ruining the carpet so it went in next. First the pad, then the carpet. The carpet had to be joined (there is a seam) and stretched to fit. The edges needed trimming. We rented a carpet kicker to stretch the carpet.

Wainscot on the walls help cut down on the wear and tear.
Wainscot
We had been living in the upstairs for a while when Dad decided to put up a wainscot. This is wood paneling that runs part way up the wall. Ours is fully half an inch thick, and we have a chair rail at the top.

Our livingroom.
Furniture
Dad also built the window sills and shelves above the closets. In the livingroom he has constructed full height bookshelves, and a custom cupboard for our VCR and piano.
Copyright © 2006 The Stover Family - all rights reserved.
(The following links open your email program)
 tell a friend about this page
Copyright 2007-2026 Practical Legacy - all rights reserved
